# Install Oracle Java JDK 18 in Ubuntu 20.04
#### **Install JDK 18 in Ubuntu:**
**1. Download Java package**
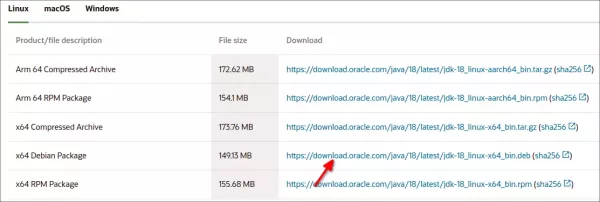
Firstly, go to oracle website and select download the .deb package:
[Download Java](https://www.oracle.com/java/technologies/downloads/)
It’s a 64-bit .deb package for modern PC and laptops.
**2. Install the .deb package**
Next, press Ctrl+Alt+T on keyboard to open terminal. When it opens, run the command below to install the package you just downloaded:
```txt
cd ~/Downloads && sudo apt install ./jdk-18\_linux-x64\_bin.deb
```
*Here you may also double-click the .deb in file manager to install it.*
**3. Set JDK 18 as default:**
It installs the language files into ‘`/usr/lib/jvm/jdk-18/`‘ directory. To set it as default, do the following 2 steps one by one.
a.) Create symbolic links for the executable files:
```txt
sudo update-alternatives --install /usr/bin/java java /usr/lib/jvm/jdk-18/bin/java 1
sudo update-alternatives --install /usr/bin/javac javac /usr/lib/jvm/jdk-18/bin/javac 1
sudo update-alternatives --install /usr/bin/jar jar /usr/lib/jvm/jdk-18/bin/jar 1
```
Similarly, add links for other executable files (e.g., `jarsigner`, `jlink`, `javadoc`) as need.
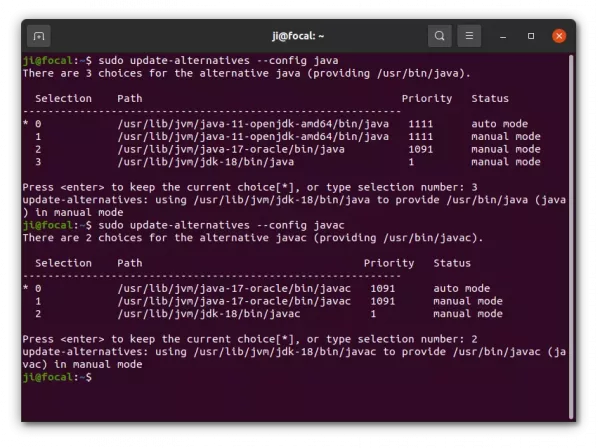
b.) Next, run the commands below one by one, and type number to select Java JDK 18 as default.
```txt
sudo update-alternatives --config java
sudo update-alternatives --config javac
sudo update-alternatives --config jar
```
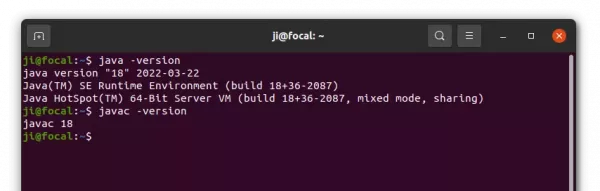
When done, verify by running command in terminal:
```txt
java -versionjavac -version
```
**4. Set JAVA\_HOME:**
Option 1.) Set JAVA\_HOME for current console, that will work until you close it:
```txt
export JAVA\_HOME=/usr/lib/jvm/jdk-18setenv JAVA\_HOME=/usr/lib/jvm/jdk-18
```
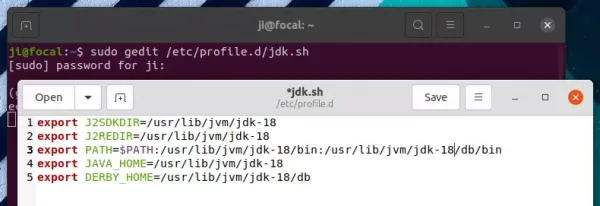
Option 2.) To make it permanent, create and edit config file via command:
```txt
sudo gedit /etc/profile.d/jdk.sh
```
then add following lines:
> export J2SDKDIR=/usr/lib/jvm/jdk-18\
> export J2REDIR=/usr/lib/jvm/jdk-18\
> export PATH=$PATH:/usr/lib/jvm/jdk-18/bin:/usr/lib/jvm/jdk-18/db/bin\
> export JAVA\_HOME=/usr/lib/jvm/jdk-18\
> export DERBY\_HOME=/usr/lib/jvm/jdk-18/db
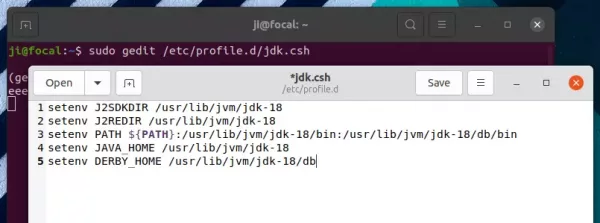
And create anther one for C shell:
```txt
sudo gedit /etc/profile.d/jdk.csh
```
add following lines and save it:
> setenv J2SDKDIR /usr/lib/jvm/jdk-18\
> setenv J2REDIR /usr/lib/jvm/jdk-18\
> setenv PATH ${PATH}:/usr/lib/jvm/jdk-18/bin:/usr/lib/jvm/jdk-18/db/bin\
> setenv JAVA\_HOME /usr/lib/jvm/jdk-18\
> setenv DERBY\_HOME /usr/lib/jvm/jdk-18/db
Finally, change the permissions via command, and it should take place at the next boot.
```txt
sudo chmod +x /etc/profile.d/jdk.csh /etc/profile.d/jdk.sh
```